Tuesday 17 September 2013

Cardboard tube and strip sculpture - Invitation


I set up this little invitation for Miss M (3yo) to create at her wish.
It was so simple to set up and can be done with every day household items.
Your children will love it to!
 
Learning Opportunities
Fine motor development
Exploring the three dimensional form of tubes
Space and Shape
Creativity


You will need
cardboard tubes of various lengths and sizes. (You can cut to size)
cardboard strips
 

provide scissors and tape
(I pre cut some pvc tape as it is thicker and easier for little fingers to manage)
 
 
Miss M got frustrated initially with the tape...


so she asked for some glue.


Success!!
She gained more confident with the glue and was happy to continue constructing.
She even went back to the tape and was less frustrated.


Her sculpture took many forms as she created and 'played' with the tubes and strips but she eventually completed her sculpture!
 
"It's a race track and cars!"
 
I love it!
 
 
Play and Learn
 
Enjoy
 
 
Katey

Monday 9 September 2013

Toddler Body Awareness Activity


One of the wonderful things about toddlers is they are developing independence and becoming more self aware. They are able to use their bodies to accomplish an increasing number of skills such as running,
 jumping and feeding themselves. They are also beginning to label and classify objects so naming and recognising their body parts is a skill they are often keen to learn.
 
This is an activity I spontaneously did one wet wintry afternoon with Miss M when she was approximately 18months. It was such a success and something she really enjoyed that I was eager to also do it with H man.
 
Learning Opportunities/ Outcomes: Body Awareness, vocabulary, Fine motor development, social interaction
Appropriate Ages: approx 15-28months
You Will Need: Large sheet of butcher paper, crayons or pencils, some interesting stickers, your child!


What To Do:


1. Say to your child that 'we are going to make a drawing of your body' and ask them to lay down on the paper. Show them the crayon or pencil and say that you are going to trace around their whole body. Talk about the parts of the body as you trace around, for example, 'here we go around your head, past your neck, over your shoulder and down your arm.' You may wish to show them how you do this by tracing around your own and their hand to start with.


2. We then hang 'our body' onto the easel but you can easily keep it on the ground or hang it on a wall or window. Start by drawing on the parts of the face. Your child may wish to do this on their own or you may like to model it, getting them to help. Judging by my attempt you do not need to be an artist!! Your child may also wish to draw on clothes, socks and shoes etc. Be sure to use plenty of modeling language as you interact with your child, 'here is the head, what is it missing? That's right, we need to draw some eyes etc' Be sure to point out all the parts of the body.
 

3. Next I got out the stickers. Most toddlers get really excited about using stickers so it's a great motivation. Ask your child to place a sticker on various parts of the outline body.
 
If your child requires a little help with this you may like to stick a sticker on their actual tummy and then give them a sticker to stick on the tummy of the outline body.
 
Be sure to start with body parts your child is very familiar with so they experience success, then move onto more challenging parts. Be sure to offer plenty of praise and encouragement throughout!


Here's H mans finished body!
Can you see all the parts he was able to identify?
 
 
Extend on This:
*Have your child stick stickers on your various body parts- they'll love it!
*Sing songs like Head, Shoulders, Knees and Toes and sing it again and again changing the body parts, Put your finger on your nose.
*At bath time give your child a washer and ask them to clean their various body parts.
*Decorate your body outline. Add hats, socks, scarves etc and talk about clothing and what parts of the body they go on.
 
Safety:
Be sure to supervise your child at all times while they are using the stickers so they don't become a choking hazard.


Play and Enjoy
 
Katey


Wednesday 21 August 2013

Peg colour matching game


This simple and spontaneous game came about from the H man's love of playing with my pegs. I love to use different objects for learning and children love to explore new and unfamiliar objects.
 
Miss M loves to help hang out the washing using the pegs however H man, at 19 months has not yet got the strength and coordination for that task and instead loves pulling them out of their container and putting them back in.
Adding in his interest in colours at the moment seemed like a perfect addition to this game!


It's amazing how they figure out what to do without any prompting from adults.
I left out a group of pegs and the matching coloured cups from the cup stacker set and he instantly set about sorting the pegs into their matching colours!
 
He is also developing his hand eye coordination!


Older children will be able to 'peg' the pegs onto the sides of the coloured containers for fine motor practice. Miss M, 3yo had a go at this!
H man really wanted to do it this way and did get a little frustrated that he couldn't work it out.
 
SAFETY WARNING: Never leave your child unattended with pegs. Pegs may contain small parts which can be a choking hazard.


Perhaps the best thing about this little game was it quick and easy and can be done over as many times as your child is engaged.
 
Didn't take long for H man to spread the pegs everywhere and enjoying running over them with his push along ride on, enjoying the bumpy sensation they created.
This game he did do over and over and over and over and over again lol.
Gotta love boys!!
 
Enjoy
 
Play and Learn
 
Katey
 
If you enjoyed this post you may be interested in more peg play in the album 'Peggy Play' on my Facebook page.


Tuesday 11 June 2013

4 ways to learn with Caterpillars


playingandlearningbeginsathome


Miss M has been learning about caterpillars and butterflies at her 3yo Kindy.
Her interest in this topic has been a big part of our day to day life at home so I thought I would take some time to share some of the things we have been up to.
 
Here are some of the ways we've used caterpillars to support learning through play!
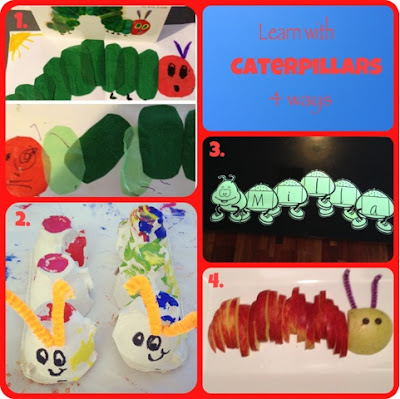
Following the numbers on the above picture!
 
 
1. Tissue Paper Hungry Caterpillars
Learning Areas/ Opportunities:
Creative, Language
 
 
This book was a big part of the learning done at Kindy and was often reread at home.
We made pictures of the Very Hungry Caterpillar using tissue paper. The finished product is very effective.
To extend on this draw or glue on tissue paper food that the Hungry Caterpillar indulged in during the story.
We also used a soft toy Hungry Caterpillar to retell and role play the story.
 
 
2. Recycled Egg Carton Caterpillars
Learning Areas/ Opportunities:
Creative, Language, colours

playingandlearningbeginsathome
Getting Creative
 

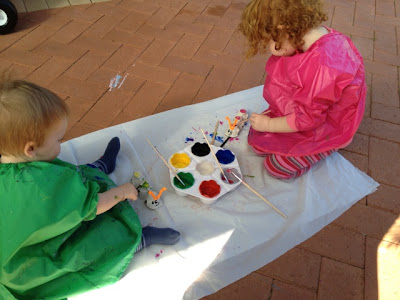
This was excellent little activity that was open ended enough to totally engage both ages of my children. Paint, collage or do both to create unique and individual caterpillar friends. Both children had a ball decorating their caterpillars, talking about the colours they were using and what their caterpillars name could be.
After they were decorated we used our new caterpillar friends to sing songs and finger rhymes. Such as,
  • How does a caterpillar go? Dear me does anybody know? How does a caterpillar go on a juicy leaf the whole day through?
  • Roly Poly Caterpillar into a corner crept. Spun a blanket around himself and for a long time slept. Roly Poly Caterpillar wakened by and by. Found himself with beautiful wings, changed into a butterfly.

 
3. Caterpillar Puzzles
Learning Areas/ Opportunities:
Maths, Spelling

 
I made this caterpillar using laminated green card. Each segment of the body is separate and has a space for writing letters or numbers for children to put in order, like a puzzle.
 
To start with I used Miss M's name then moved onto other familiar words. Older children could do this with spelling or sight words.
You could bring in numeracy by using numbers and getting children to create number lines with the caterpillars body.

 
Here's a number caterpillar Miss M made with limited assistance. Use numbers to suit the ability of your child. If your child is younger you could still do this focusing on colours.
 

4. Caterpillar healthy fruit snack
Learning Areas/ Opportunities:
Healthy Eating, social and emotional

What's more fun and inviting than creating yummy snacks.
Children can help prepare this delicious apple and pear caterpillar and then enjoy eating it! Use this opportunity to reinforce healthy choices and why fruit is good for our bodies! Encourage children to work together and share their healthy snack.


Enjoy

Play and Learn

Katey
 
 
If you enjoyed this post please feel free to share and leave your comments. I enjoy ready everyone!

Tuesday 4 June 2013

Make your own Tape Measure!


Children need plenty of hands on experiences to develop an understanding of measurement and what it involves. Measuring is finding out 'how much' of a particular unit of measure something is. It involves an understanding of the attribute to be measured (in this circumstance length or height), knowledge of how to measure the attribute and a good understanding of number.
 
 
To introduce the concept of measurement using indirect (non standard) measure to Miss M (3yrs) I decided to start with length.
(other attributes of measurement are area, volume, mass and time)
 
Measuring with indirect units or non standard units of measure means measuring things with blocks, straws, hands and feet etc. As long as the units used to measure are the same size.
 
Direct measure or standard means measuring with direct units such as centimetres, inches etc, and using rulers and tape measures.


Making their own tape measure offers up such wonderful opportunities to practice the concept of measurement, comparing sizes and other math skills such as counting and ordering.


At a recent follow up Paediatrician appointment we discovered Miss M was
exactly 1metre tall!!
So we decided to make her tape measure to her height of 1metre. This added the extra bonus of her being able to use her tape measure to find objects that where taller, shorter and the same height as herself! You do not need to make your tape measure to any set length, it can be random.
 
 
Suitable Ages: 3yrs plus
 
Learning Opportunities
  1. Practice and extend on understanding of measurement using indirect measure
  2. Develop and extend on understanding of Length and height
  3. Develop and extend on new vocabulary- length, height, measure, tall, taller, shorter, same
  4. Develop and extend on math skills of counting and comparing

You will need
A long strip of card to desired length
paint for printing
object to be used as unit of measure on the tape measure
(hand or foot prints work well but other objects can be used also)


We used Miss M's hand prints as hey they were easily available and such a real life object. You could use foot prints or stamped shape prints such as stars etc.

 
When making the prints be careful to make sure each print starts where the one before finishes so there's even spaces and the 'measure' is more correct!


We had made our strip of card to 1metre, Miss M's height and we counted out her hand prints as we did them.
 
She is 9 (of her) hand prints tall!! Which means much more to her than 1metre!
 
 
We are in the midst of moving H man out of the nursery and doing up his room in preparation for the newest member of the family so there has been plenty of measuring furniture and spaces to see if it will fit.
 
Miss M got straight into measuring much of the furniture in our house.
 
She discovered many objects that were 'taller' or 'bigger' than her.
 
She was thrilled to find this chest of drawers was 'the same height' as her!
 
 
She was able to group objects into categories of 'taller', 'shorter' and 'the same'.
 
She got plenty of counting practice!!

 
It was fun to measure the 'height' of her toys!


Her little brother too!!
 
The opportunities are endless!
 
Play, experimenting and measuring with her tape measure still continues!!
 
 
Play and Learn
 
Enjoy
 
Katey


If you enjoyed this post please feel free to share and comment! I enjoy reading every one of them.


Wednesday 29 May 2013

Drawing Underneath!


Doesn't this look like fun?!
I can't imagine too many little ones who wouldn't want to have a go at this fun activity.
 
The best bit is, this simple idea is great for strengthening the large muscles of the upper arm and shoulders which are essential for fine motor movements.
 
What a motivational way to get hesitant or even not so hesitant mark makers developing and strengthening those essential muscles.
 
Children of all ages will really enjoy this!


You will need
 
A low table, bench or similar.
Make sure it is not too high and that your child can easily reach when laying down on their backs.
Pens, textas, pencils, crayons etc.
Paper, taped under the table.
Cushions or something cosy and inviting for children to lay whilst creating their masterpieces!


Be sure to have plenty of paper and tape as they will likely want to draw and draw and draw!
 
Children will love doing this solo, in pairs and in groups!
 
I would often have small groups working together on a drawing in my classroom. The conversations were brilliant and it was a great way of motivating children to work together!
 
This is something we come back to every now and then, changing it up with different writing implements.
 
I hope you enjoy,
 
Play and Learn
 
 
Katey
 
 
If you like this post please feel free to share and comment. I enjoy reading them all!!

Sunday 21 April 2013

Toddler's first colour sort


Having an afternoon free to play with the H man one day whilst Miss M was at pre Kindy I decided to try him out with this little colour sort game.
 
 
One of the things I love about the H man is that he has a mind of his own and decides himself how he thinks toys should be played with. This does make playing with him very interesting and I have to step back and follow his lead. He plays a lot differently than Miss M did at the same age and like all children has his own set of interests.
 
Often books are eaten, blocks are thrown, dolls and soft toys are banged together and all sorts of toys are used as missiles.
 
One thing he generally always like to play with is balls. Perhaps, that's because he is allowed to throw these balls inside as they are soft and light.


At the time of doing this the H man was 14 months.
He was showing interest in colours and liked to match objects of the same colour.
I decided to start this concept of sorting with just two contrasting colours.
 
I filled one basket with a mix of blue and red balls.
Then I added a square of blue card to another basket and red card to a third basket, showing the H man and talking with the H man about what I was doing.
Then I demonstrated for him and picked out a blue ball from the basket and put it into the basket with the blue card. All the time talking about what I was doing.
"Here is a ball, this ball is blue. I will put it into the basket with the blue card."
 
The H man got right into it and loved moving the balls from one basket to the next. He seemed to understand the concept of sorting the colours too...


...but of course had to do things his own way lol!


This lasted all of about 30 secs till the balls were once again used as missiles!!
But still we got those 30secs!!
 
All children are different. This is a game my Miss M would have delighted in and would have played over and over again even at this young age.
She loved purpose and structure to her play at this age.
 
Remember to follow your child's lead. If they are really engaged and into the task stick with it, add more colours etc. If like the H man they clearly show you they are done with the game go with it. This ended up being a chase the balls around the house and bring them back to the tub kinda game with a lot more ball throwing and chasing along the way lol!
 
Enjoy
 
Play and Learn,
 
 
Katey

Wednesday 27 March 2013

Plastic Easter Egg Games


These plastic Easter Eggs are everywhere at the shops. They are cheap and colourful, they can open and can be used for a wide range of play based learning opportunities.
 
I purchased these eggs last year from my local $2 shop and we played many games then when Miss M was just 2 and I had not yet started blogging!
 
 
Some of the games I remember playing back then with her were
 
  • simple colour sorting
  • hide n seek games
  • Tongs and egg carton play for fine motor
  • sensory tub
  • Alphabet match up
(where I wrote the capital letter on one half of the egg and the lower case on the other half)


This year I thought it would be great to focus on numbers.
 
Miss M is very capable with numbers 0-12 so we used numbers 11-22 however you could play this game with any combination of numbers depending on the ability level of your child.
 
Suitable Ages: Can be adapted to suit ages 2-8yrs
 
To Prepare:
 
  • Write selected numbers onto the bottom of an egg carton as shown in above picture
  • Write corresponding numbers in permanent marker onto the plastic eggs as shown in the picture below. Make sure you do one egg per number.


To Play:
 
  • Hide the plastic eggs. This can be done inside or outside. Don't make them too tricky to find as little kids can get easily frustrated.
  • Give your child the egg carton with the numbers inside and tell them they need to find an egg with the matching number for each of the spaces in the carton.
  • During the hunt the children find the numbers and put each egg into it's matching space in the egg carton. Be sure to get your child to tell you the number on each egg
  • This game can be played in pairs or individually. It can also be done with a large group if they all have their own set of eggs to find and egg carton.


Change the game by playing it with these different ideas
  • letters
  • colours- put diff colours at the bottom of the egg carton
  • Shapes

 
Miss M and her little friend had a great time finding all the numbered eggs!
 
"I found 17" "I found 11"

 
They wanted the eggs hidden over and over again both inside and out!
 
In the end they were hiding the eggs for each other to find!
 
It wasn't long till they were both very confident with their number recognition of these numbers!
 
This made for a great play date game however, I can see Miss M wanting to play this lots over the Easter long weekend!
 
 
We hope you and your families have a lovely time celebrating Easter with your families!
 
Play and Learn,
 
 
Enjoy
 
 
Katey

Thursday 21 March 2013

Egg and Chick Easter Craft ~ Playgroup


Here is a cute little activity we did at Playgroup in the lead up to Easter.
 
With an awareness of different beliefs and views amongst members we focused on talking about new life and new beginnings.
 
Suitable Ages: Can be adapted to suit multiple ages
 
I was unable to get any photos of the children doing this activity as I was hands on the whole time, discussing, asking, answering and assisting the children.
 
Learning Opportunities
Fine motor skills
Language and Vocabulary
Discovery of the sense of touch
Discussion on Chickens and other animals that hatch from eggs
Role Play


To Prepare
I drew a simple chick shape and photocopied onto white card and cut out
Attach the chicks to pop sticks with tape
Cut out egg shapes from white card


Colour some cotton wool balls.
(this photo was taken after the activity)
 
I used chalk powder in a bag and shook it with the cotton wool inside.
I've also done it before with powered paint and that works better, especially if you give them a light spray with water from a water bottle, however I didn't have any and the chalk worked ok.


To introduce the activity I filled this surprise bag with the cotton wool balls and I asked the children to put their hand inside and tell me what they could feel. I assured them it was safe and would not hurt them.
 
We got soft, fluffy and woolly. A few children made a guess of what they thought was inside. I then showed them the cotton wool asked them to tell me some things they knew that felt soft,fluffy or woolly.
 
I then introduced the cardboard chick and told the children that we were going to use the cotton wool to make our chicks soft and fluffy like a real baby chick.
 
 
Have the children glue some cotton wool onto their chick.


After our chicks were all fluffy, we talked about where chicks come from.
 
EGGS!
 
Each child was then given a card egg and we did some more gluing and stuck some crepe paper on to colour the egg.
 
We discussed how the chick got out of the egg.
They hatch
They crack the shell with their beak
 
I told the children we need to crack our egg so our chick can hatch out


To do this we used scissors to cut a crack in our egg.
 
Most of the 3yr olds in our group had a go at doing this themselves with safety scissors.
Parents assisted and helped the younger children do this.


Now our chicks are ready to hatch out of their eggs!
 
I showed the children how to place their chicks behind their eggs and we learnt this little song.
 
I'm a little Chickie ready to hatch,
pecking at my shell scratch, scratch, scratch.
When I crack it open out I leap,
fluff my feathers with a cheep, cheep, cheep!
 
 
Children can act out this song with their chicks and eggs and then they can act it out themselves and pretend to be the chick in an egg, hatching.


To Extend This
Read some books and stories about chicks and chickens.
Talk about other animals that hatch from eggs, ducks, snakes etc.
 
 
Play and Learn
 
 
Enjoy
 
Katey
 
 
If you enjoyed this post, please feel free to share it and leave your comments. I enjoy reading every one!!